
 Like nearly all things to do with the sport of cricket, the Ashes, a long-standing rivalry between the national teams of England and Australia, has a story behind it. In fact, a lot of stories. For instance, the fact that the Ashes got started at all is largely due to the singular efforts of an Australian fast bowler named Fred Spofforth, seen at right. One fateful day in 1882, Spofforth’s diabolical deliveries demolished the cream of English batting, bringing consternation on the land. A pundit gloomily announced the death of English cricket, adding that its ashes would be taken to Australia. And thus was born one of the great traditions of international sport. With the 2019 Ashes about to get started in England in a couple of days, please go ahead and give our Ashes Quiz a try.
Message category: Close-up
July 30, 2019
The Ashes Trivia Quiz
November 23, 2017
Santa’s Secret Valley — now for mobile and the web
Age cannot wither it, nor custom stale its considerable variety. Santa’s Secret Valley is back from a sojourn of 22 years in the land of Microsoft Windows, and it’s ready at last for mobile (Android) and the web. You can play the demo version of Santa’s Secret Valley (about a quarter of the game) in any modern web browser, or buy the inexpensive paid Android app through Google Play.
SSV, as we call it when pressed for time, is a graphical adventure game in which the player takes on the role of Fizbin, a particularly sleepy North Pole elf. One day in December, Santa puts Fizbin in charge of guarding three precious magical items that Santa will need on Christmas Eve: his boots, his bell and his famous red sack. It’s an easy-sounding assignment, but when Fizbin wakes up from a perfectly understandable sleep in Santa’s living-room, the three treasures have vanished.
Santa’s well-laid plans have gone south, and now Fizbin — you, the player — must do the same. The road to adventure lies through that open window and across the snowy waste beyond.
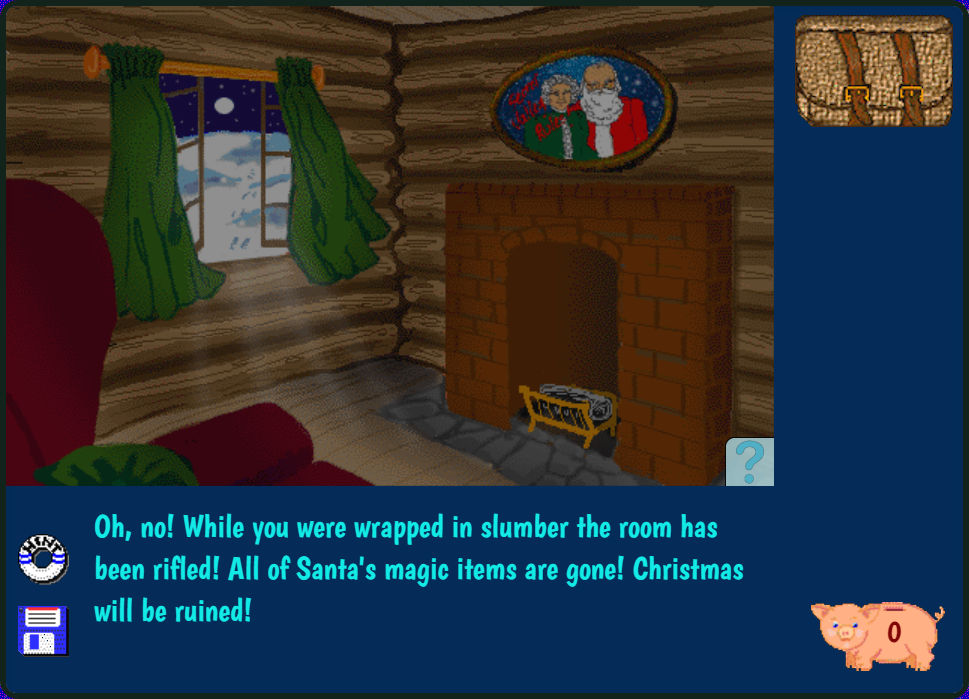
In Santa’s Secret Valley, you interact with a scene by clicking or tapping areas within it. Mouse users will see the pointer assume different shapes in different parts of the scene. Mobile users can get this information by tapping the Reveal Hotspots tool, the question-mark button at the bottom right corner of the scene: the mouse pointers used in the scene are displayed for a few seconds, each centered over the area where it applies. In this scene, Reveal Hotspots will show two active areas: the window and the portrait.
What really defines an adventure game is not adventures so much as puzzles, and you’ll find plenty of those in SSV. A puzzle can take many forms: locks whose combination you have to work out, mazes you have to navigate, objects whose hidden purpose you must discover, and unexpected connections between things or places that you must unravel. As you journey through the game you need to be observant, for you never know when some innocent-seeming feature of a scene will turn out to be a critical clue. It is a good policy to be suspicious of all things in all scenes in case there is more to them than meets the eye.
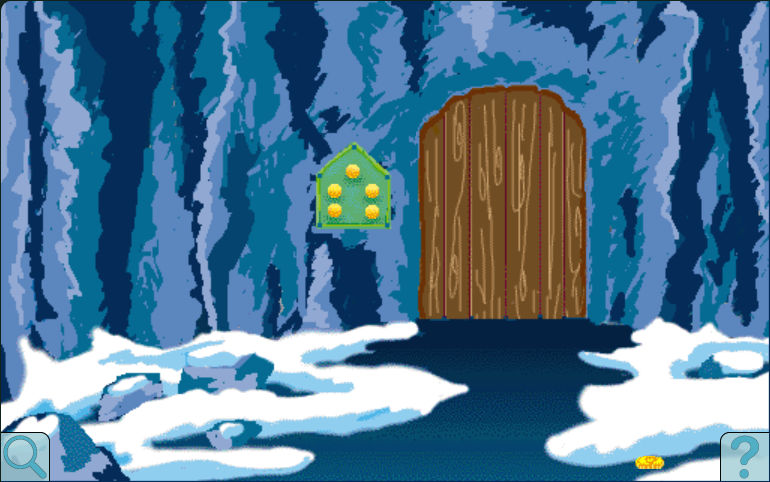
An early puzzle in SSV is the combination lock to the left of the door in this scene. The gold buttons provide a musical clue if you have enabled sound effects. If you are playing on a system without a mouse, as illustrated here, the scene includes a Magnify tool at the bottom left. When this button is present, activating it zooms in on some feature — in this case, the button panel — so that touch users can interact with it at a more convenient scale.
A problem with some puzzles, and some adventure games, is getting stuck: you may find yourself wandering about the game world in frustration, unable even to guess how and where progress can be made. A degree of frustration can be a good thing — it spurs creativity — but before it starts to threaten your health in SSV, you should turn to our comprehensive hint wizard. The wizard can give you tips about the scene you’re in or about something you’re carrying. It can guide you through a maze or give you advice on what to try next. It can even teach you how to use the hint wizard. The catch is that using most hints costs you “hint points”, which are tracked throughout play, and don’t go away even if you restart the game. How many hint points you are willing to run up in the course of completing the adventure is up to you. For the sake of honor, or bragging rights, you might wish to keep your hint point expenditures to a minimum. It is, of course, possible to solve the entire game without opening the hint wizard at all.
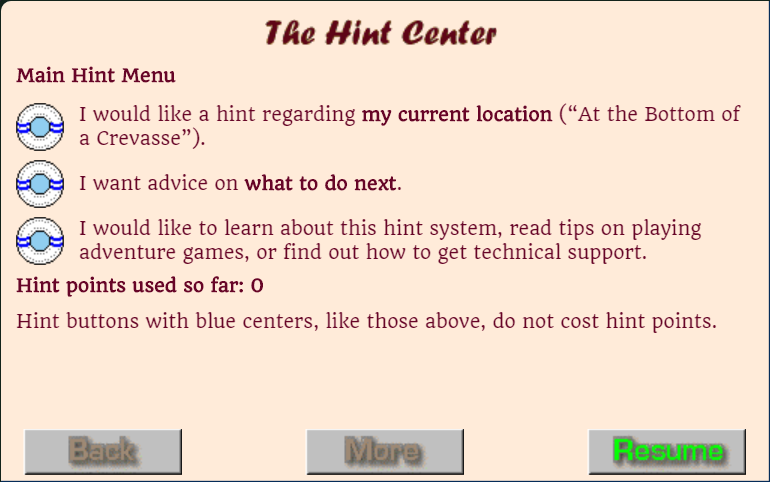
The SSV hint wizard is activated by the life-ring button on the main display, and is operated by life-ring buttons on the hint pages. The three buttons on this opening page give access to the main parts of the hint system. To return to the game, activate the Resume button.
SSV lets you store the game at any point in play to one of 8 reusable slots. You can reload any of these simply by clicking its slot on the utility screen. In addition, the current game is automatically saved, and restored at your next session.
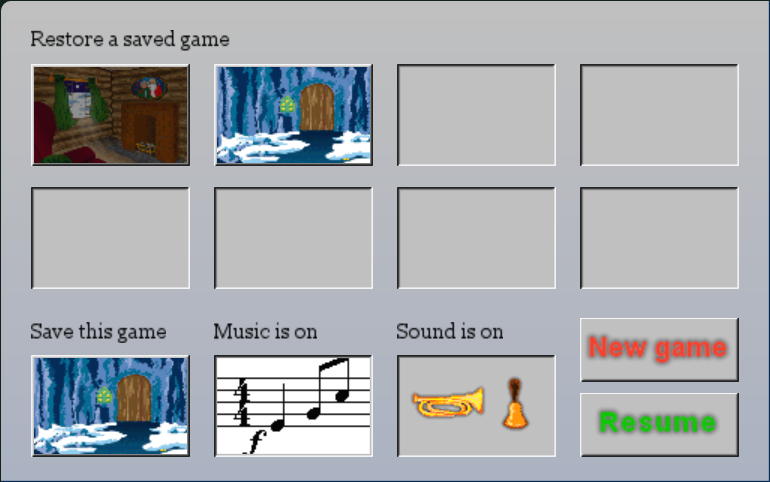
The SSV utility screen is activated by the diskette button on the main display. In addition to the two rows of slots for saved games, the screen provides a view of the current scene (bottom left), buttons to toggle music and sound, and a button to clear the current game and start over. To return to the game, activate the Resume button.
For more details on how to use Santa’s Secret Valley on both desktop and mobile devices, please see its Lore page on FamilyGames.com.
November 18, 2017
Valvo — now for Android devices and web browsers
One of the first releases from FamilyGames.com in the 1990s was a strategy game named Valvo. It’s a simple game that combines the barest essence of backgammon with a faint whiff of snakes and ladders. And it has valves. Now we’re releasing Valvo all over again in a free version for the web and an inexpensive paid Android app that you can get through Google Play.

Valvo is a game for two people playing at the same device, or for one person playing against the built-in AI. Play is divided into short rounds in which each player’s pawn travels from a home square towards a destination. At the end of the round, points are awarded to one side or the other based on which pawn has made the most progress. The scoreline shows the points for the current round (if one is in progress) and the cumulative score since the totals were last reset.
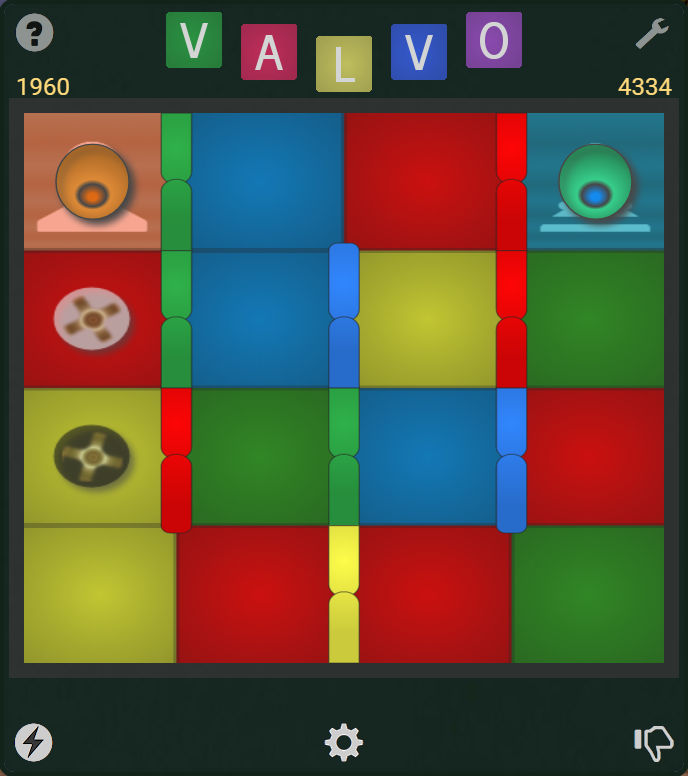
Valvo at the start of a round, on a 4×4 layout with 4 valve colors. The opposing pawns are in position on their home squares, facing ahead. Left has first move this round (it alternates). The circular “carets” in the left column show where Left’s pawn can move. Left is behind in the overall match, with 1960 points to Right’s 4334.
An important feature of Valvo is that you select your move from a small number — at most two — of randomly-chosen possibilities. This is one of the ways in which it somewhat resembles backgammon. (Another is that each player is in a race to reach the other player’s home position.) On every turn you will be offered the option of moving two spaces, assuming your way is not blocked. Half of the time, you will also have the option of moving only one space. The other half of the time, if enough spaces ahead are clear, the second option will instead be to move three spaces.
Valvo’s most distinctive feature is its valves, which bear the same colors as the board squares. When a pawn’s turn is over, the valves that match the color of the square it landed on immediately slide open (while any currently open valves close). By cutting across the usual lanes of travel, an open valve offers a shortcut either forwards or backwards. If a pawn lands beside an open valve, it must use that valve, even if its position suffers thereby. If a pawn lands between two open valves, it must use the disadvantageous one. If multiple valves are open in a row, a pawn entering the first one must continue through the others as well until it can go no farther. A key element of Valvo strategy is to plan ahead so that the valves will be advantageous to your own pawn and deleterious to your opponent’s.
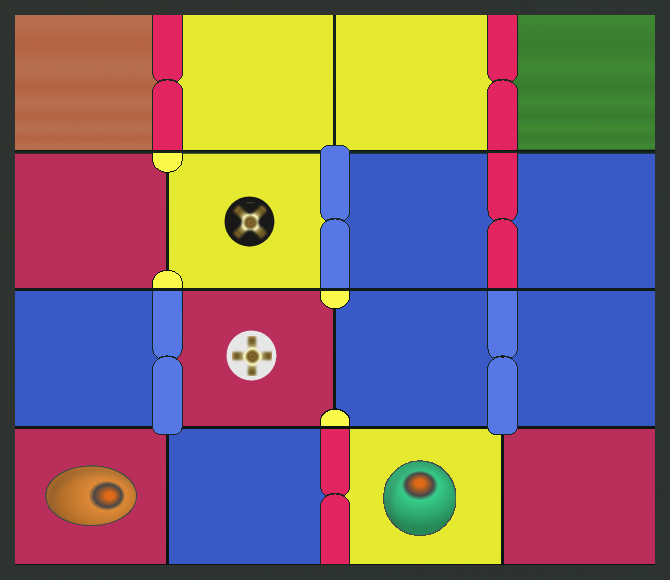
Right (with the green pawn) has just moved onto a yellow square, causing the yellow valves to open. Left, who is now to move, is given the choice of traversing two squares (light caret) or three (dark caret). In the first case, Left will advance through the open valve to the third column, blocking Right’s progress and ending the game with a win. In the second case, the open valve on the left will demote Left to the first column, giving Right the advantage for now.
The end of a round comes when either player reaches the destination, or when neither player can move (because the pawns have blocked each other). In either case, the points for the completed round are awarded based on the finishing positions of the pawns. The board then resets with a new randomized color distribution and the next round is ready to begin.
A match ends when the cumulative score reaches a winning total as agreed upon by the players beforehand. The size of the winning total is up to you. As a starting point, we suggest multiplying the number of squares in your Valvo board layout by a factor of 5 to 10. For instance, if you are playing with 6 columns and 5 rows, an objective of 150 to 300 would be reasonable. The advantage of this using this rule of thumb is that it keeps the number of rounds required to play a match approximately equal, regardless of the layout used. If you prefer shorter or longer matches, simply decrease or increase the factor.
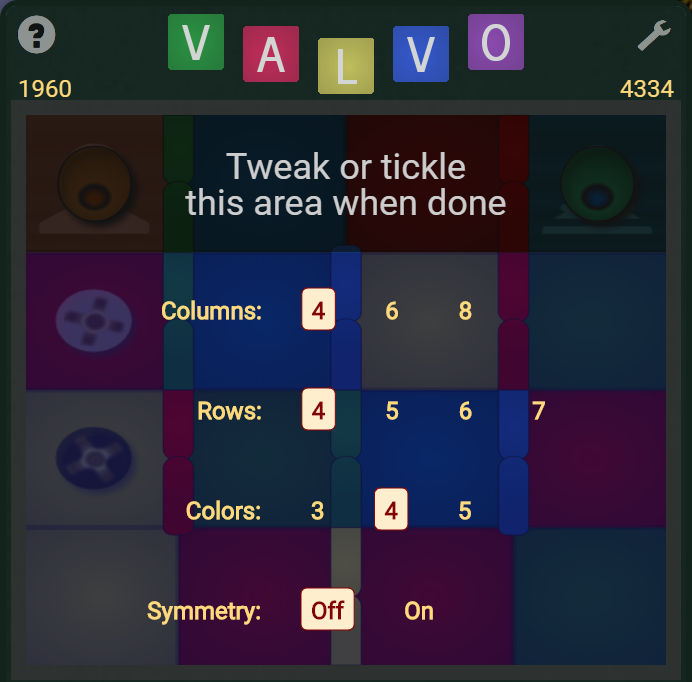
Configuring the layout in the demo version of Valvo (the app version provides additional options). The layout panel opens when you click or tap the configuration cog-wheel button below the game board. To dismiss the panel, click or tap in the darker upper bar. (N.B. Button locations are shown on the full board image above.)
Valvo’s board layout is configurable between rounds only — you can’t change the board size in mid-round except by first abandoning the round. (To do that, click or tap the thumbs-down button at the bottom right below the game board.) The app version of Valvo, which is available for Android devices on Google Play, gives you full control over details of the board layout. It also lets you vary the strength of the program AI across a wide range, even during the course of a round. The hemisemidemo version of Valvo, which you can play for free on FamilyGames.com, has similar but fewer layout and AI options.
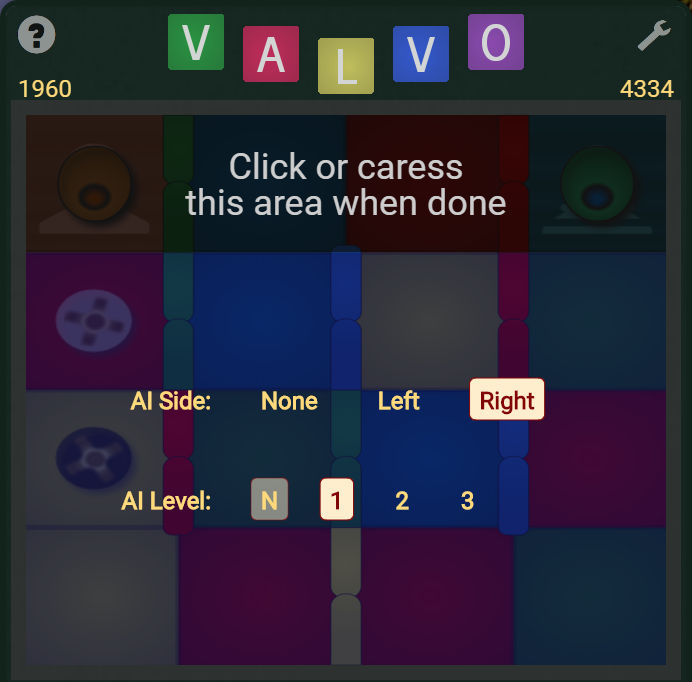
To configure either side to be played by the computer, click or tap the lightning-bolt button at left below the game board to open this panel. As with the board layout options described above, the app version of Valvo provides some options not shown here. To dismiss the AI panel, click or tap in the darker upper bar. (N.B. Button locations are shown on the full board image above.)
Valvo includes a help screen that compactly describes the details of play. Click or tap the question mark at the top left of the game screen to access it. Each help text is accompanied by an illustration, or a sequence of illustrations. The illustrations in a sequence advance automatically at intervals unless you take control manually with the accompanying navigation arrows.

This screen provides help for Valvo in nine topics, each individually illustrated. When a topic has multiple illustrations (like the one shown here), navigation arrows are provided for manually stepping between them. If you don’t use the arrows, the sequence will advance automatically every few seconds.
Valvo also includes a settings screen, where you can switch on or off the built-in music soundtrack and the graphical backgrounds feature. Ten or so varying graphical backgrounds are included. Cycle through them until you find one you like. The images appear in the page background, behind the game proper. If you switch off the graphical backgrounds feature, a simple gradient fills the background area. On some devices, only a small amount of background area is visible regardless of which background style you choose.
October 13, 2011
First note
What is the best note with which to introduce the keyboard and notation to a beginning piano student? Tradition and habit offer middle C as the automatic choice, and at first sight it has some clear advantages. After all, it’s the one note that you can play with either hand in the home position — at least when the home position is defined by having both thumbs on middle C. And that’s not all. Middle C is pivotal for notation, the bridge between the treble and bass staves, and a gateway to both. On the page, it’s easy to spot because there’s a line through it. And it’s just about right in the middle!
There are problems with middle C, however, that might send us in search of another candidate. To begin with, it’s the one note about which you have to worry which hand to use or which staff it’s on. Confusingly, it is drawn differently from the other notes. Even worse, it is not especially easy to locate on the keyboard: the white note to the left of the middle pair of black notes. Children’s often-dodgy sense of the difference between right and left can delay progress for significant minutes as this threshold is crossed.
But if not C, then what? Where else to turn?
 It’s actually not a hard choice. For recognition on the keyboard, the easy winner is D: smack between the middle pair of black keys, with no messing about. A child could find it. The distinctive position of D below the treble staff is also easy for the teacher to specify and the student to remember. In the home position, D falls under the index finger — the same one you use when you’re pointing at it. The index finger is easier for rank beginners to play with good hand posture than is the transversely-mounted thumb, whose proper use takes longer to develop.
Once D is known, the next step, to the left-hand B, symmetrically placed and notated, is easily taken. But then where next? Back to C? Not so fast. If I were to take up teaching again, I think I would be inclined to leave the thumbs idle at first and instead explore the other fingers in turn, if only as a way of avoiding the usual stale melodies for a while by excluding the C major scale. The thumbs would enter last, leading naturally into position shifts thereafter.
August 19, 2010
A look at NoteCard 3.2’s oversized piano keyboard control
 The available oversize keyboard control in NoteCard 3.2 comes as a bit of a visual shock, but will permit extra mousing accuracy.
This is the text of a press release: “Learning Musical Notes A Serious Pleasure With Notecard 3.2 (but satisfying user expectations needed literally out-of-the-box thinking, reveals developer)”.
AHA! Software has released a newly-enhanced version of its popular music education application, NoteCard, whose goal is to help even musical beginners achieve rapid but profound memorization of the musical notes. According to the developers, the new release retains NoteCard’s traditional focus on results, but continues an ongoing effort to make the software more approachable for users of all ages.
“We still have some great features in the pipeline for future cycles, but on this occasion we concentrated more on ease of use, and adapting to evolving user expectations”, says developer Nick Sullivan, who wrote the first version of NoteCard on a Commodore 64 computer in 1983, and has continued to extend and refine it ever since. “For instance, we had reports that some users found the keys on the onscreen keyboard to be just a bit too narrow for complete mousing accuracy. We suspect that in most cases this problem would probably have dissolved anyway after a little extra time spent with the program, but the fact remains that for some customers it made NoteCard less approachable.”
The goal of widening the onscreen piano turned out to pose a tricky design challenge, however. The piano keyboard already consumed nearly the full width of the NoteCard window. Widening it further would require either enlarging the window itself, or creating a new, independent window of the required size, but the designers were unenthusiastic about either option. Reconfiguring the main window seemed like overkill when the goal was to accommodate a single instrument. But giving the user the burden of a second window to manage was just as undesirable.
To resolve this design dilemma , the team decided that although a wider secondary window was necessary, physically detaching it from the main window was not. When the user selects the wider keyboard display in NoteCard 3.2, the keyboard appears simply to expand beyond its window borders. When the main window is moved, the keyboard window automatically moves along with it.
The resulting arrangement may raise some eyebrows for its lack of orthodoxy, says Nick Sullivan, but he predicts that users will adapt without difficulty. “It does look a bit odd right at first, as though NoteCard had suffered some sort of aneurysm. But then you see it behaving like a perfectly conventional window, one that just happens to stick out a bit at the sides, and you forget all about it.”
AHA! Software’s unvarying design ideal for the NoteCard software, easily stated though difficult to achieve, is to help users memorize the musical notes as efficiently as human brains will allow, and then recall them quickly and infallibly when needed.
“Note-reading is a prosaic skill”, says Sullivan. “It’s not essentially musical at all. But if you can read with speed and confidence from almost the very start, it’s a huge advantage. Many beginners spend far too much of their practice effort consciously decoding the notes. With NoteCard, note-reading becomes largely subconscious, as it is for an experienced player. That leaves the conscious mind free to deal with more important things, such as music.”
About the NoteCard software
NoteCard is a product of AHA! Software, distributed through AheadWithMusic.com. NoteCard can be operated either in Free Mode, at no cost, or in Paid Mode, with additional features, following a one-time payment of $19.75. Discounts are available for institutional and group purchases. NoteCard is available for laptop and desktop computers running Windows XP, Windows Vista or Windows 7. Use of a MIDI instrument keyboard for note input is supported but not required.
# # #
For information about topics covered in this release, or to schedule an interview with the creators of the NoteCard software, please contact us at news@aheadwithmusic.com.
August 4, 2010
The world in a small window
The biggest new feature in version 1.9 of World Geography Tutor, which we’re rolling out this week at FamilyGames.com, is the optional larger view that is now supported. Some users have found WGT’s small window size a matter of curiosity since the app first came out back near the turn of the century, and admittedly it might seem like an odd choice. After all, is it not more convenient to work on a large, non-scrolling map if the monitor screen is big enough? Why doesn’t World Geography Tutor provide that option?
I’m not sure I’ve ever answered this question in public, though I’ve explained the reason often enough to individuals. In fact we particularly wanted the window to be small enough that the user would be required to scroll. The issue is not one of convenience, but of learning theory. On a fixed map, you might think you’re memorizing the location of The Gambia, but in fact your memorization is clouded by a detail that should be irrelevant but is irresistibly exploited by your memory as the new information is processed. That detail is the position of The Gambia on the display. On a fixed map, each country stays put with respect to the enclosing rectangle, be that a window boundary or a monitor screen, and that extra positional information is included in the new memory. While you remain at your computer, the added information, arbitrary though it is, will actually make recall easier. But it’s also a crutch. In an environment where the positional cue is absent — a conversation, say, or a test — recall won’t be nearly as good.
What you should really be doing is memorizing each country in the context of the shape of its containing land mass and the countries surrounding it on the map. It means far more to know that The Gambia is on the west side of Africa nested inside Senegal than that it is on the left side of the monitor screen two centimeters below the logo. On a scrolling map, your memory is compelled to depend more on the geographically-relevant cues, and the importance of the physical context is reduced. Since the learning goal is primary, we went with a scrolling map.